
Like a normal web browser, 3D WebView blocks web pages from accessing the device's camera and microphone by default. However, applications can use Web.SetCameraAndMicrophoneEnabled() to enable camera and microphone access. On Windows, no additional configuration is needed. However, on macOS, Android, iOS, WebGL, and UWP additional project configuration is needed in order to successfully grant camera and microphone access:
- macOS camera and mic access
- Android camera and mic access
- iOS camera and mic access
- WebGL camera and mic access
- UWP camera and mic access
For additional WebRTC topics, please see these sections:
- How to select which camera, microphone, or speaker is used
- How to share video from a Unity camera on a video call?
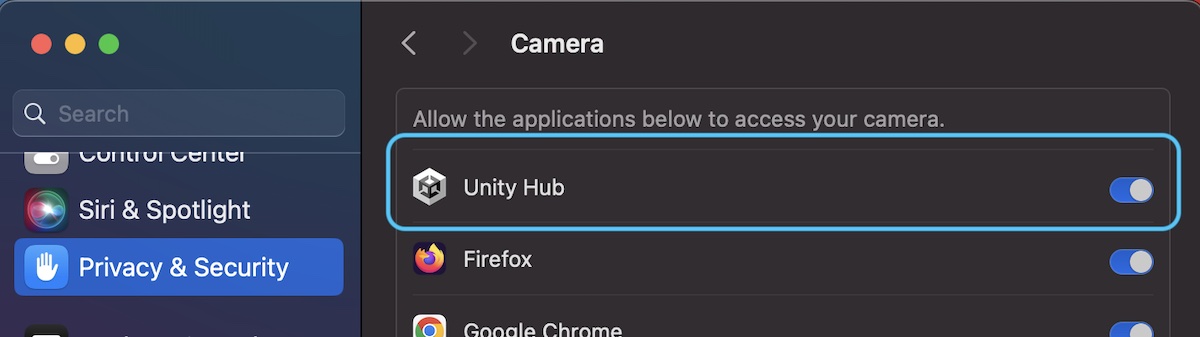
macOS camera and mic access
For macOS, the following two steps are required in addition to calling Web.SetCameraAndMicrophoneEnabled():
- To use the camera and microphone while running in the macOS Unity editor, it's necessary to go to the macOS System Settings app, click "Privacy & Security", and then use the "Camera" and "Microphone" menu options to enable camera and microphone access for Unity Hub.


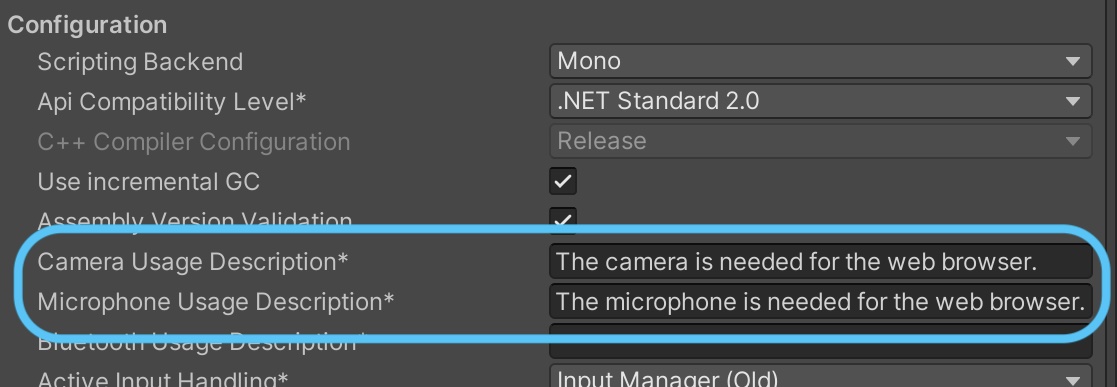
- To use the camera and microphone in a macOS player build, it's necessary to go to Unity macOS Player Settings -> Other Settings -> Configuration and fill in text for the "Camera Usage Description" and "Microphone Usage Description" fields:
Android camera and mic access
For Android, the application can either enable camera and microphone access together with Web.SetCameraAndMicrophoneEnabled() or separately with AndroidWebView.SetCameraEnabled() and SetMicrophoneEnabled(). In addition to calling one of these methods, the following steps are required in order to enable camera and/or microphone access:
The application's AndroidManifest.xml file must include the following permissions, as demonstrated in this example AndroidManifest.xml file:
The application must also request camera and microphone permissions at runtime. Alternatively, during development, you can manually grant camera and microphone permissions to the app via the Android Settings app.
iOS camera and mic access
For iOS, enabling the camera and microphone is only supported in iOS 15 or newer and is only supported in Native 2D Mode. The application can either enable camera and microphone access together with Web.SetCameraAndMicrophoneEnabled() or separately with iOSWebView.SetCameraEnabled() and SetMicrophoneEnabled(). In addition to calling one of these methods, you must also enter text for the "Camera Usage Description" and "Microphone Usage Description" in iOS Player Settings -> Other Settings:

The first time that a web page tries to access the camera or microphone, the operating system displays permission prompts containing the text that you entered for the camera and microphone usage descriptions in Player Settings. If the user grants permission, then this step occurs only once, and the permission prompts aren't shown on subsequent runs of the app.
If the application programmatically enabled camera and/or microphone permission by calling Web.SetCameraAndMicrophoneEnabled(), iOSWebView.SetCameraEnabled(), or SetMicrophoneEnabled(), then no further permission prompts will be shown to the user, and web pages will be able to access the camera and/or microphone. If the application did not programmatically enable camera or microphone permission by calling one of those APIs, then the default behavior is that when a web page tries to access the camera or microphone, the webview shows a second set of permission prompts to the user asking for permission for that specific website. Unlike the first permission prompt, this one is reshown every time the app runs.
Not all websites that use the camera and microphone correctly support mobile Safari. Here's an example of one that does, which can be used for testing.
WebGL camera and mic access
For WebGL, if the Unity WebGL app is loaded in a Chromium based browser (e.g. Chrome, Edge, Opera) or in FireFox, then no additional steps are required in addition to calling Web.SetCameraAndMicrophoneEnabled(). However, if the Unity WebGL app is loaded in Safari (i.e. on iOS or macOS), then there is an additional limitation that you should be aware of, which is that Safari only allows camera and microphone access if the Unity WebGL app is loaded from an https:// URL or from localhost (i.e. http://localhost:{port}). If the Unity WebGL app is loaded from an unsecure http:// URL other than localhost, then Safari will block camera and microphone access (i.e. navigator.mediaDevices will be undefined). In other words, in order to be able to access the camera or microphone on iOS or macOS, your Unity WebGL app must be served over HTTPS. For an example of a Unity WebGL site served over HTTPS that enables camera and microphone permissions, please the WebGL WebView Demo.
UWP camera and mic access
For UWP, in addition to calling Web.SetCameraAndMicrophoneEnabled(), you must also enable the "WebCam" and "Microphone" capabilities in UWP Player Settings -> Publishing Settings. Also, if you have an existing UWP build directory, you will need to delete it after adding these capabilities so that Unity regenerates the app's manifest file with the new capabilities.

How to select which camera, microphone, or speaker is used
For WebRTC, the web page itself can choose which camera, microphone, and speaker is used by calling the enumerateDevices() JavaScript API to view the available devices. For more info, please see the following resources: